Create a Test Suite from Browser
Returning to the web client to create a test suite that contains the two test scenarios that have been defined. so for, i.e. the simple test Scenario we created through the web client and the test scenario we created in Eclipse and uploaded to the server.
Complete the following steps to create and execute a test suite.
Log into the web client and navigate to Test suites in the left menu.
Click the Plus button to add a new Suite.
Select the environment that you used for creating the test scenarios.
Click the Plus button in the Test scenarios in suite panel and find the test scenario created in the browser.
Click the Plus button in the Test scenarios in suite panel and find the test scenario uploaded from Eclipse.
Click Create new.
You should have a suite that looks like the image below:
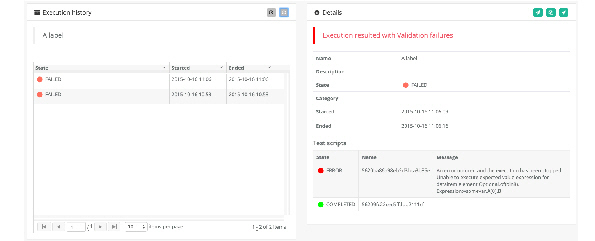
The suite can be scheduled similarly to the schedule for the test we set up earlier. The suite can also be executed directly. Click the Rocket button to execute the suite. It will redirect you to the Reports age where the execution will be running. Click Refresh until the suite completes. Now you should see a result that includes the result for each test scenario in the suite. The result below show an error to illustrate that the suite will have a Failed/Error state if just one of the test executions failed.