SMF Data Management
The SMF Data Management section of iStrobe allows you to set up an archive database, manage data in the database, and schedule jobs for archiving or permanently deleting data from the iStrobe SMF database.
SMF Data Archiving Process
The SMF Data Archiving process can either archive data by moving existing data in the CES database to the archive database (i.e. backup database) or permanently delete data from the production database that is no longer required.
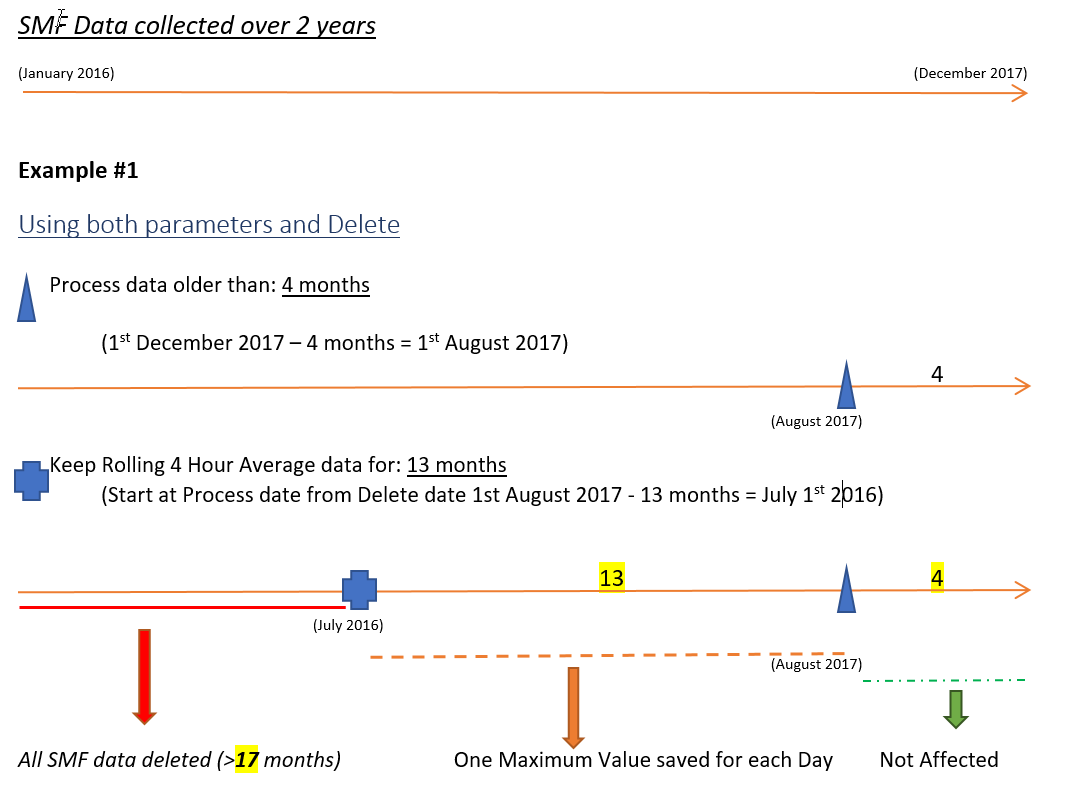
This process operates off two variables.
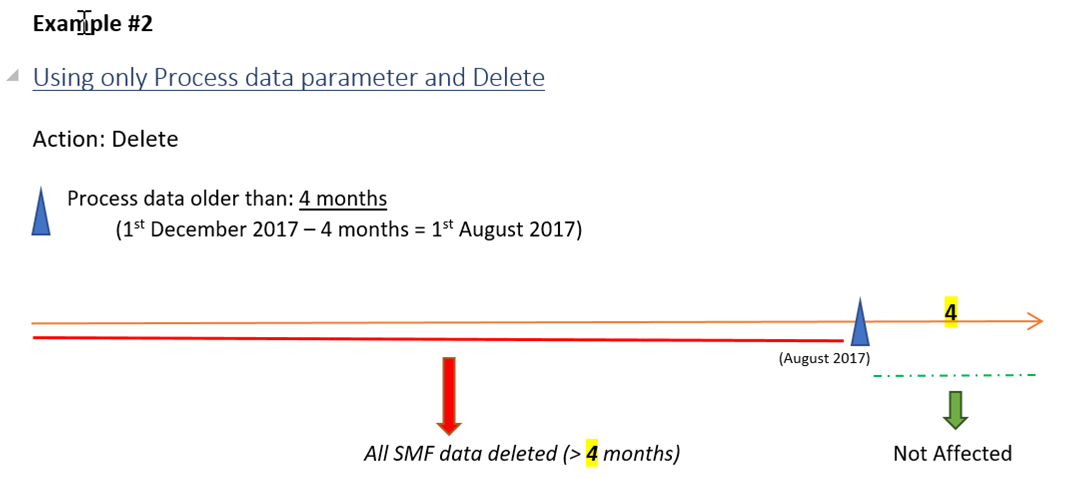
“Process data older than” – This variable controls the age of data that is kept in the CES database. Any data older than the specified number of months will be archived or deleted, except data required for proper reporting of Rolling 4-Hour Average data as specified by the next variable.
“Keep Rolling 4 Hour Average data for” – If enabled, this variable specifies that 1 day of data is to be kept in the production database for some number of months beyond the time specified by the first variable.
For example, if “Process data older than” is set to 3, and “Keep Rolling 4 Hour Average data for” is set to 3, then all SMF and MSU data will be kept in the production database for 3 months, and 1 day of MSU related data will be kept for an additional 3 months. That is, months 1-3 will contain all SMF and MSU data, while months 4-6 will each contain 1 day of MSU related data.
The specific MSU data that is kept for the additional time is the following:
Job Step Interval Data
Job Step Termination Data
Job Termination Data
System Busy Data
MSU Data
To determine what MSU data to keep for the extra time (in our example, months 4, 5 and 6), the database is queried to determine the specific day each month that the highest rolling four hour MSU occurred. Once this day is determined, the data in the tables specified above is retained for that day. All other data in the tables for these months is archived or deleted.
SMF Data Actions
From the SMF data actions tab, you can archive, restore, or delete SMF data in the iStrobe database by selecting a value appropriate for the selected time interval and clicking the appropriate action button.
To archive SMF data to the archive database
From the SMF data actions tab, click the drop-down to choose the appropriate time interval (days, weeks, months).
Enter a value appropriate for the interval.
Click Archive.
To restore SMF data from the archive database
From the SMF data actions tab, click the drop-down to choose the appropriate time interval (days, weeks, months).
Enter a value appropriate for the interval.
Click Restore.
To delete SMF data from the iStrobe database
You can permanently delete SMF data from the iStrobe Product database by selecting a value appropriate for the selected time interval.
From the SMF data actions tab, click the drop-down to choose the appropriate time interval (days, weeks, months).
Enter a value appropriate for the interval.
Click Delete.
Schedule SMF Data
The Schedule SMF Data Management tab allows you to schedule jobs for either archiving iStrobe SMF data from the iStrobe database to the iStrobe SMF Archive database or permanently deleting iStrobe SMF data from the iStrobe database. Before being able to create a schedule, you must have first setup an iStrobe SMF Archive database. See Configure SMF Archive Database to set up an iStrobe SMF Archive database.
In Schedule action, select an action:
Archive – allows you to archive SMF data from the iStrobe database to the iStrobe SMF database. This action also deletes the data from the iStrobe database. You are able to later restore this data to the iStrobe database.
Delete – allows you to permanently delete SMF data from the iStrobe database. You are not able to restore the deleted data.
In Process data older than, select the appropriate time interval (days, weeks, months) and enter a value appropriate for the interval.
In Scheduler will run, select a time interval for running the scheduled job. You can choose to run the scheduler on a daily basis, on the first day of every week (Monday), or on the first day of every month. You can also choose to stop running a scheduled job by choosing Never.
In Starting at, select the appropriate time interval (AM or PM), and enter the appropriate hour.
Click Apply.
Once scheduled, a job can be rescheduled or stopped by changing the action or timing and resubmitting it. The rescheduled job will be effective within ten minutes. If you want to stop a scheduled job, select Never in Scheduler will run (step 3).
Examples of Scheduling