Appendix A: Tutorial — Add a Component to the Repository with the Web Client
In this tutorial, we will add two components to the repository. We will use the sample COBOL program XAPGMTST that contains a complex linkage section, and we will use the sample XAPGMBT1 main batch program that needs custom JCL. We will learn how to define source and runtime parameters for the program and how to use the Total Test COBOL scanner to analyze the linkage section and give us the data structure needed by the repository. Program names must be unique within a specific environment so it might not be possible to do the final Create, but all the preparation can be made.
Exercise
Add the called COBOL program XAPGMTST to the repository and add the main batch program XAPGMBT1 to the repository through the web browser.
Step-by-step for a Called Program
Complete the following steps to add the XAPGMTST component to the repository
Open a browser and logon to the Total Test client. Select the Component Repository > Components menu to the left and then click the Plus button in the upper right corner in the Components table.
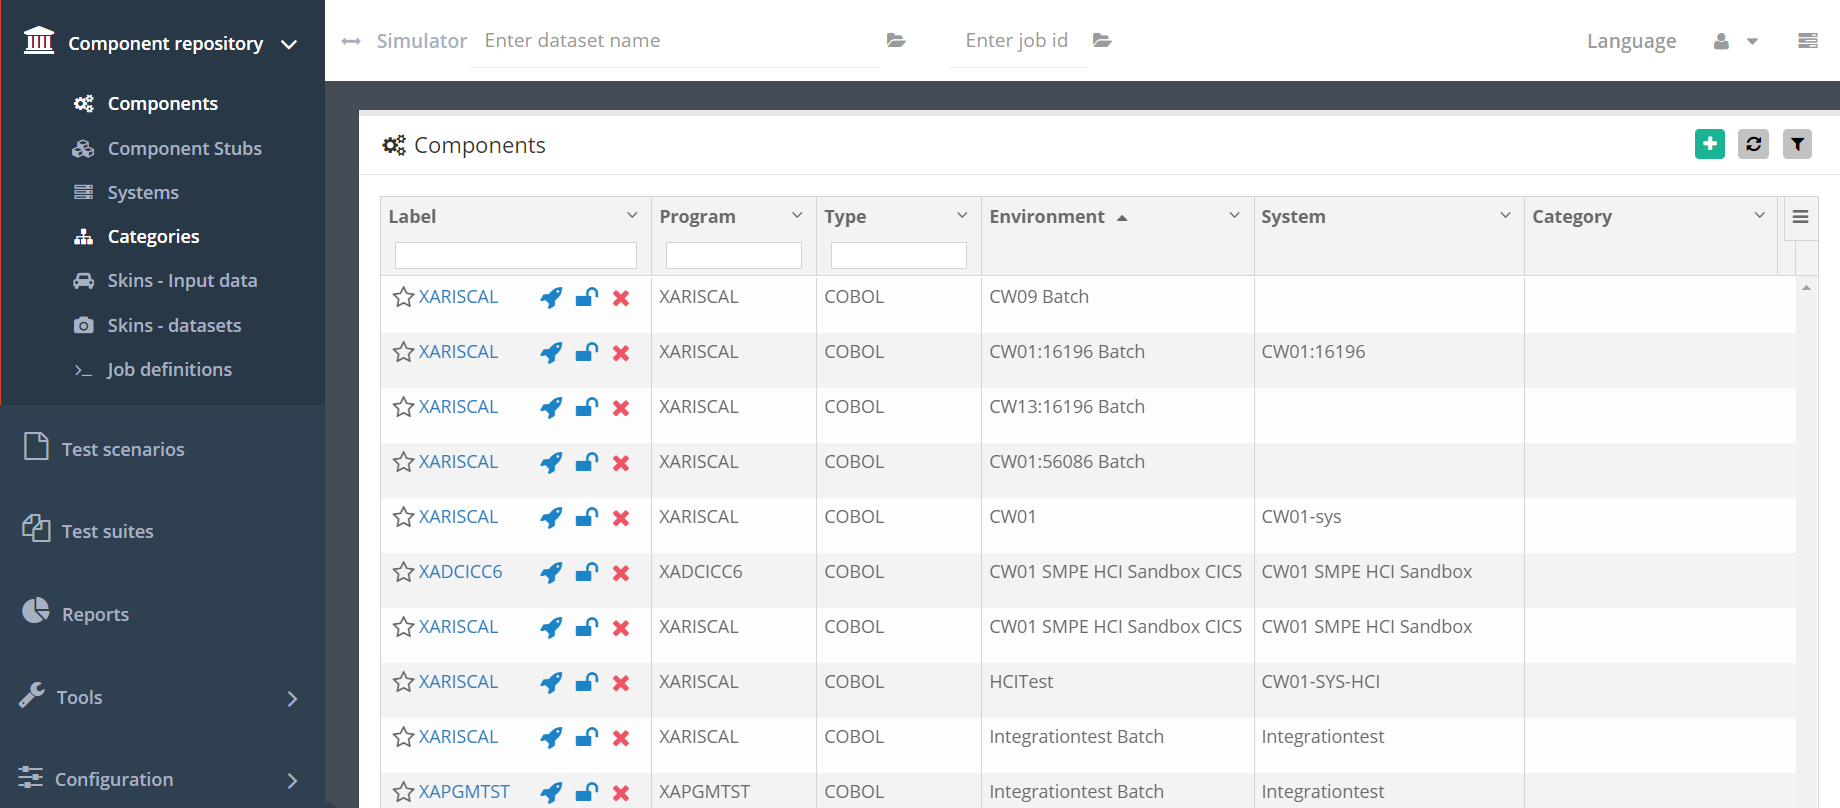
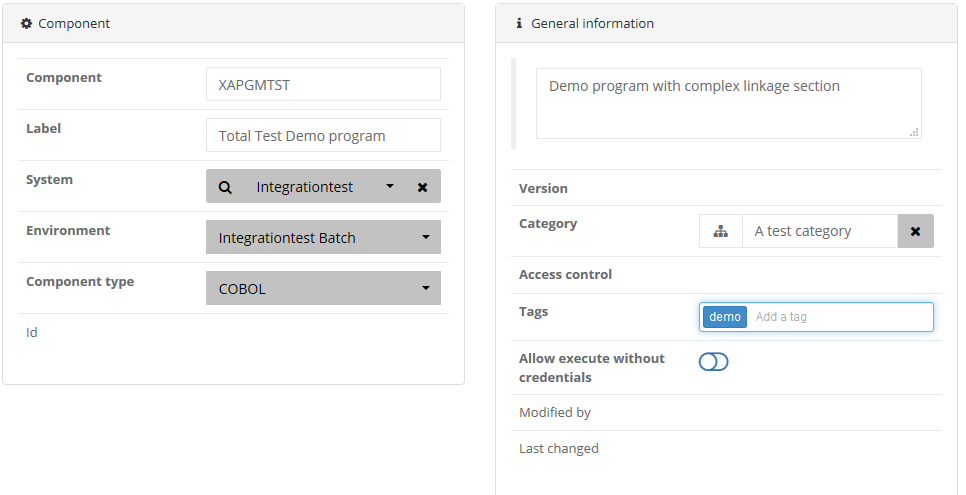
As Component name enter XAPGMTST, and select an environment in which the component exists. The Component type should be COBOL.
Optionally, enter a description, a label, select a category and add tags. All these options help in locating the component in the repository.
Optionally, enable the Allow execution without credentials. This is only used when you create graphical skins for the component and you want to provide direct links to end users.
We will NOT select a System for now. A system defines commonly used source and runtime parameters and is used to normalize these parameters for a group of programs. Instead of using a System we will define the source and runtime parameters. Later we will try to use a System.
The Component and General information parameters should look like this:
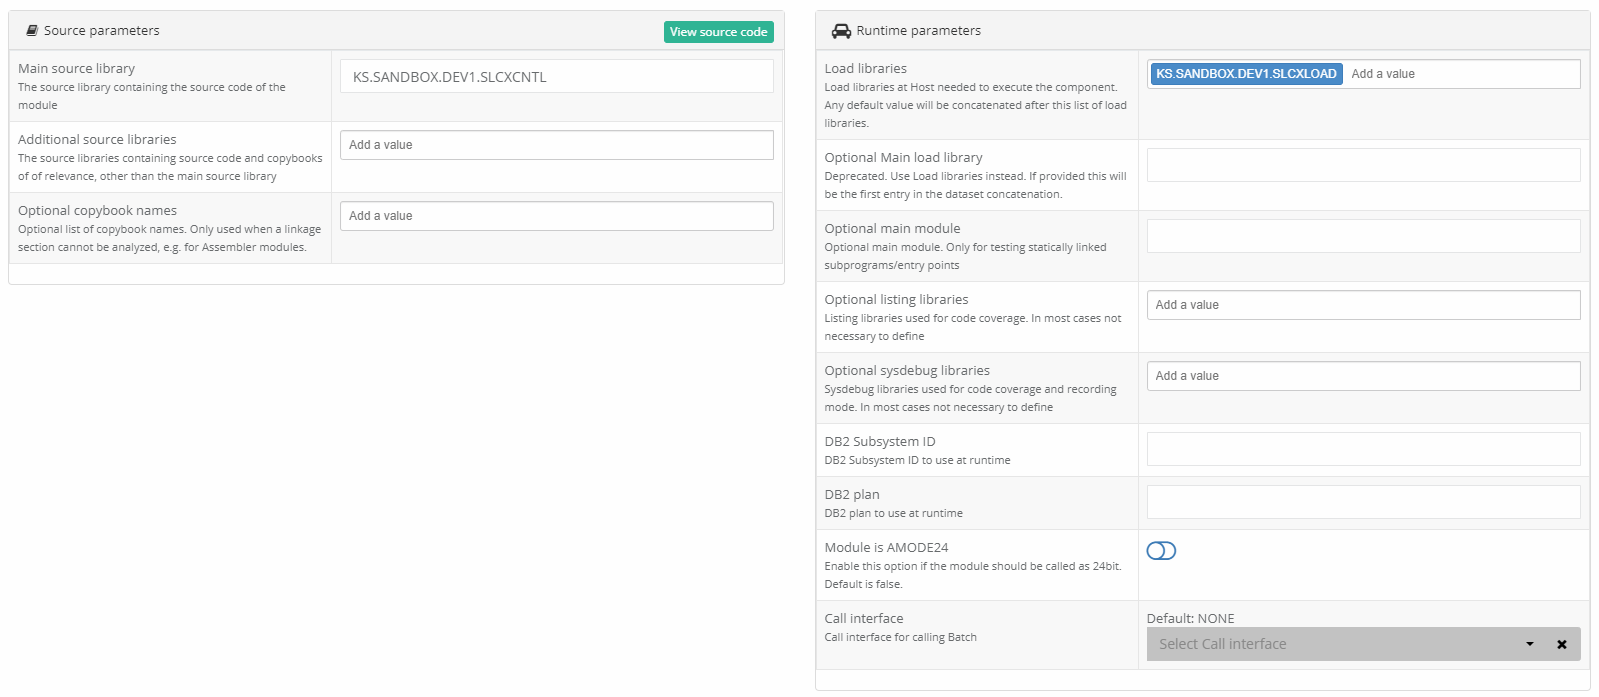
Next, let us define source and runtime parameters. For the Main source library, enter the library in which the source code to the program is located. Additional source libraries should include all libraries with copybooks used by the program. Additional source libraries are not needed when no copybooks are used or they are located in the main source library. For XAPGMTST the main source library is hlq.SLCXLOAD. The browser might provide code completion and will show a list of available libraries after the first . has been entered. If you don’t see the list of suggestions, you have to change your user profile to enable suggestions while writing, or you might have entered a wrong host password. You can reenter the host password from the top right corner: click the down-arrow and select Enter host credentials.
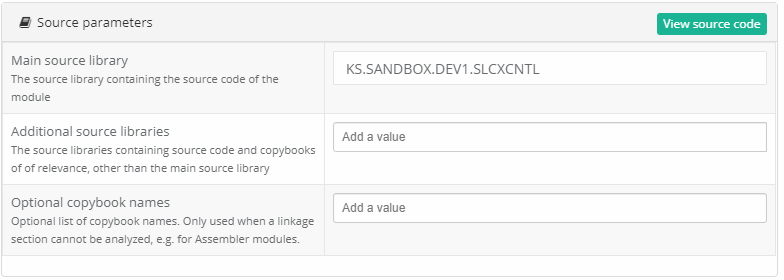
After entering the main source library, try to click the View source code button. This should open the source code of the program.
Optionally, enter any Additional source libraries for members not located in the Main Source library. This will be needed if your copybooks are in a different library than the source module.
In the Runtime parameters section in the Load libraries field, enter the load library where the load module of XAPGMTST is located. This is hlq.SLCXLOAD. This field also provides code completion.
The Db2 Subsystem ID, Db2 plan and call interface can be left empty. The default values that might be there are taken from the selected Environment. If a System had been selected, the default values would be from the System.
The References part should be left empty. This is where you can define JCL that should be used to setup the Component.
Source and Runtime parameters should look like this:
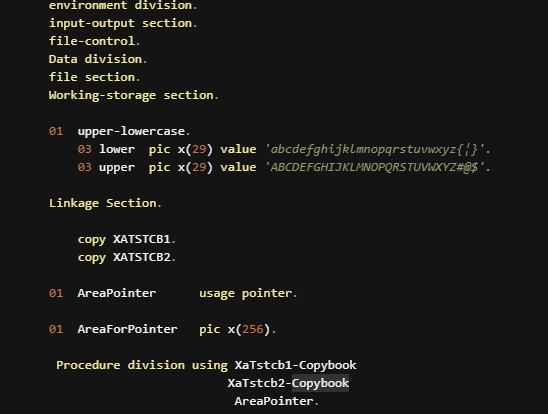
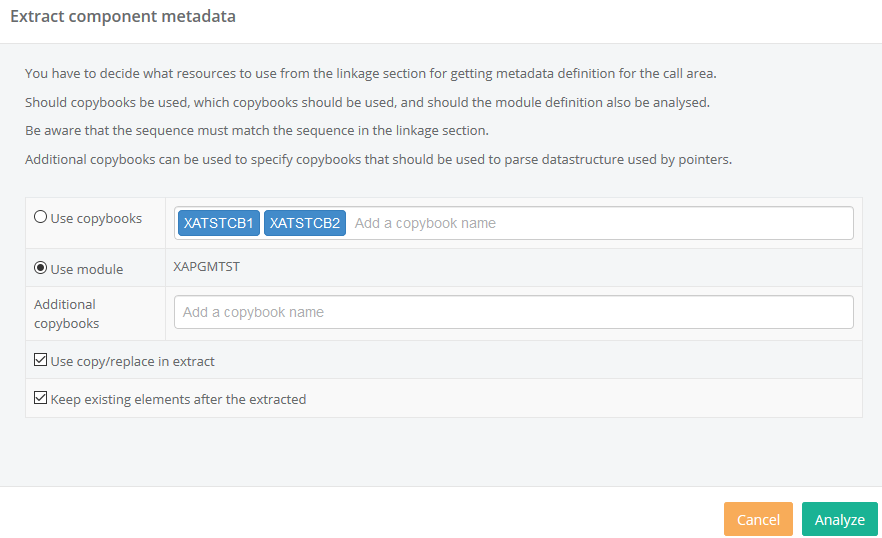
The Input/Output datastructure for the component can be entered manually in the Data structure section or created automatically by clicking the Extract data definition button. Click the button. This will cause the z/OS agent to analyze the linkage section or copy books of the program. Select the Use module option in the dialog below and click Analyze.
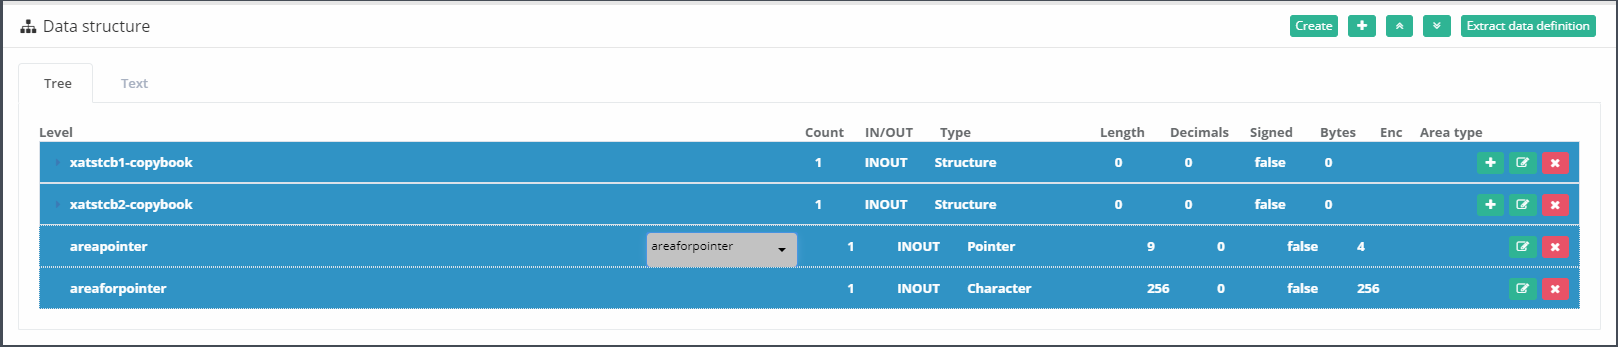
This will return the data structure of the program. Manual changes are not need for programs without pointers. However, our XAPGMTST includes a pointer field called areapointer. We need to manually specify what data structure the pointer points at. This areapointer points at another field called areaforpointer. We select this in the dropdown field to the left of the areapointer field. The referenced areaforpointer field is not itself included in the call area. We exclude the field by clicking at the Include toggle next to the field. We now have a data structure like this:
Optionally, click the Edit button at a field to set a description of the field, optional UTF8 encoding, a default value and if the field is considered input, output or both. These settings except the UTF8 encoding are used for usability improvements.
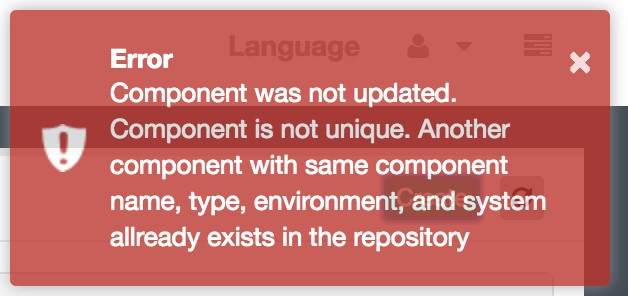
The component definition is now complete and can be created in the repository by clicking the Create button. Two components with the same name cannot exist in the repository, and as XAPGMTST might already have been added, you might get an error. If you get the error, then go back to the repository and find and select it to see that the definition is like the one you defined.
Step-by-step for a Main Batch Program
You could also have used a System to avoid setting source and runtime parameters manually. All Total Test sample programs share the same parameters, and therefore it makes sense to have a Total Test samples system. It defines the main source and load libraries and can also define Db2 settings for the Db2 sample programs. If the Total Test samples system is available, then you can try to define the component with the system. If it is not available then create it.
Complete the following steps to add the XAPGMBT1 component to the repository.
Like before, in the Components table, click the Add button and as Component name enter XAPGMBT1.
Select the Total Test samples system. This will make specific environments available and perhaps just one environment available which will then automatically be selected.
Click the View source code button to see the source of the program. Close the source code by clicking the x in the top right corner.
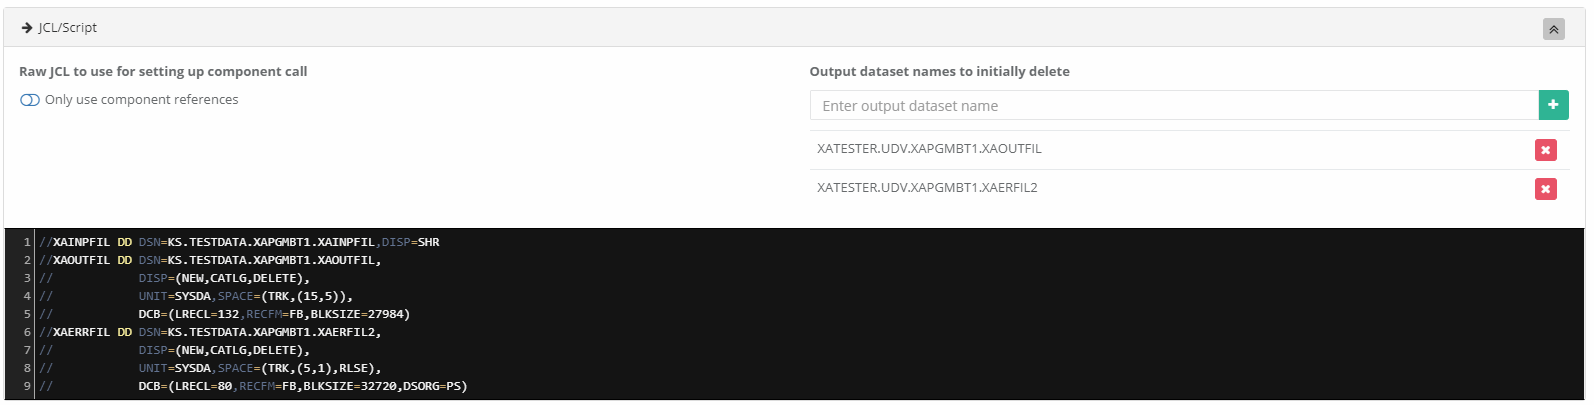
This program does not have a linkage section. Instead it relies on JCL to setup input/output datasets. In the JCL/Script section, enter the JCL below:
//XAINPFIL DD DSN= XATESTER.UDV.XAPGMBT1.XAINPFIL,DISP=SHR
//XAOUTFIL DD DSN=XATESTER.UDV.XAPGMBT1.XAOUTFIL,
// DISP=(NEW,CATLG,DELETE),
// UNIT=SYSDA,SPACE=(TRK,(15,5)),
// DCB=(LRECL=132,RECFM=FB,BLKSIZE=27984)
//XAERRFIL DD DSN=XATESTER.UDV.XAPGMBT1.XAERFIL2,
// DISP=(NEW,CATLG,DELETE),
// UNIT=SYSDA,SPACE=(TRK,(5,1),RLSE),
// DCB=(LRECL=80,RECFM=FB,BLKSIZE=32720,DSORG=PS)
The program can only be executed when the output and error dataset do not exist. Add the two datasets to the list of output dataset names that should be deleted by Total Test before executing the program.
The JCL/Script section should look like this:
Click Create to create the component. As in the previous example you might get an error that the component already exists.