Using the Web Client
In this section, we will see how the web client can be used to execute a module from the browser, how we can create a test scenario from the entered input value and that validates response values from the component.
To access Topaz for Total Test from the web browser:
![]() Note: Starting with Release 20.05.01, Topaz for Total Test uses the CES authentication to access the Topaz for Total Test Repository Server. Consult your CES administrator for Topaz for Total Test server and login information. Your user ID must have the role of Topaz for Total Test User or Topaz for Total Test Admin assigned to access the page. Refer to the Security Settings topic in the Compuware Enterprise Services User Guide for more information.
Note: Starting with Release 20.05.01, Topaz for Total Test uses the CES authentication to access the Topaz for Total Test Repository Server. Consult your CES administrator for Topaz for Total Test server and login information. Your user ID must have the role of Topaz for Total Test User or Topaz for Total Test Admin assigned to access the page. Refer to the Security Settings topic in the Compuware Enterprise Services User Guide for more information.
Open the Topaz for Total Test server URL.
For example:
http://<host>:<port>/totaltest/Enter your CES UserID/Password to login.
At successful login, you will see a dashboard with customized information for you.
With the login, you also check out a license through CES. Refer to the Topaz License Settings topic in the Compuware Enterprise Services User Guide for more information.
![]() Note: Chrome browser is recommended. Edge, Firefox, and Internet Explorer (IE) 11 and above can also be used. However, IE will have some limitations in functionality. Also, if IE is used and a blank page appears, do the following:
Note: Chrome browser is recommended. Edge, Firefox, and Internet Explorer (IE) 11 and above can also be used. However, IE will have some limitations in functionality. Also, if IE is used and a blank page appears, do the following:
Press the Alt key to show the menu line in IE, then choose the Tools menu and disable Enterprise mode.
Refresh the page and the Login page should appear.
Executing a Module
A module can be executed directly from the browser with input values that you define.
To find and execute the XAPGMTST program from the web browser:
Open the Topaz for Total Test server URL and enter the user ID/password to login.
In the navigation pane, click the Component Repository > Components to access program interfaces. The Components panel appears.
Find the example program XAPGMTST by entering its name in the Label column field.
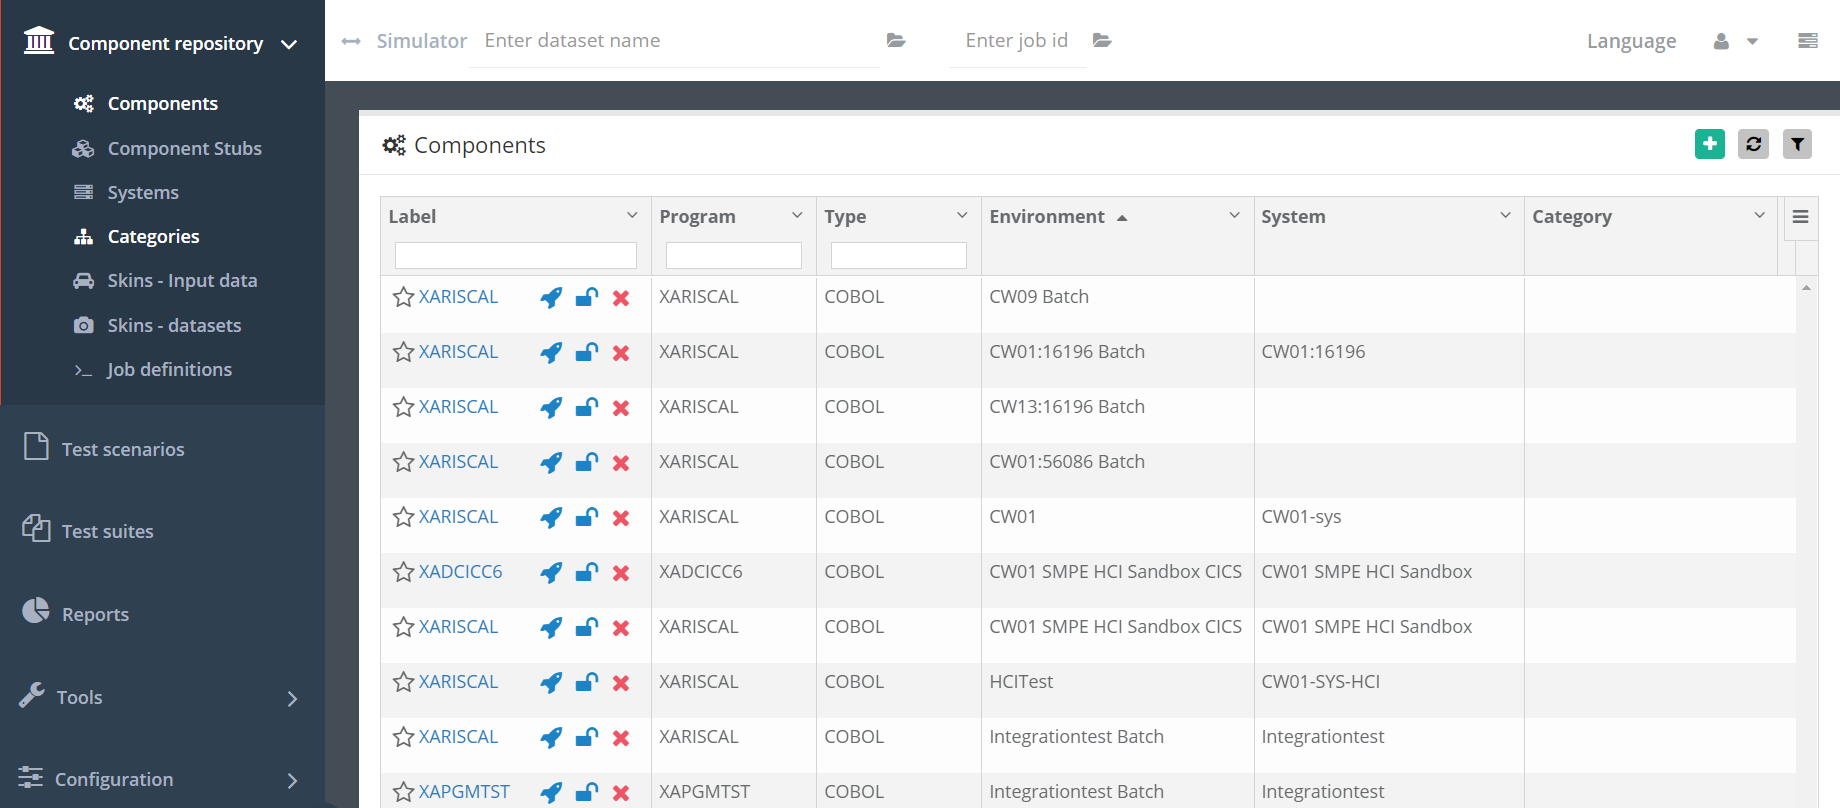
Click on the component for one of the platforms to see its details. You can see information about source libraries, load libraries, on what environment it is being executed (BATCH or CICS), what the data structure is, and other runtime information.
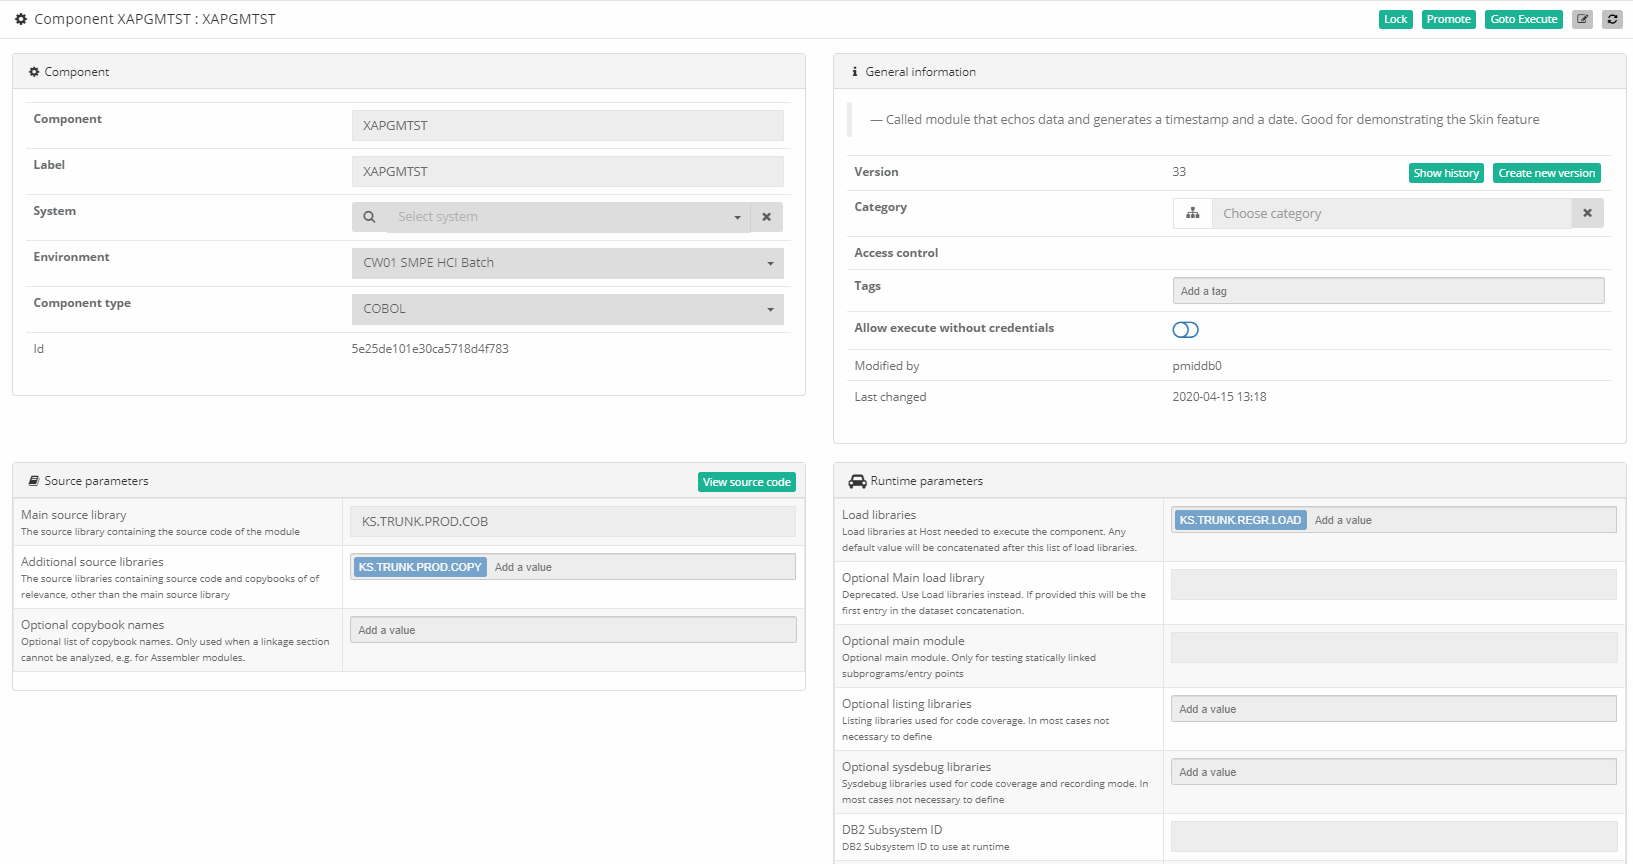
Click the Goto Execute button, which will link you to next panel where input data can be defined for the module execution.
Enter some data in the Value column for chartype char8 and char16 fields
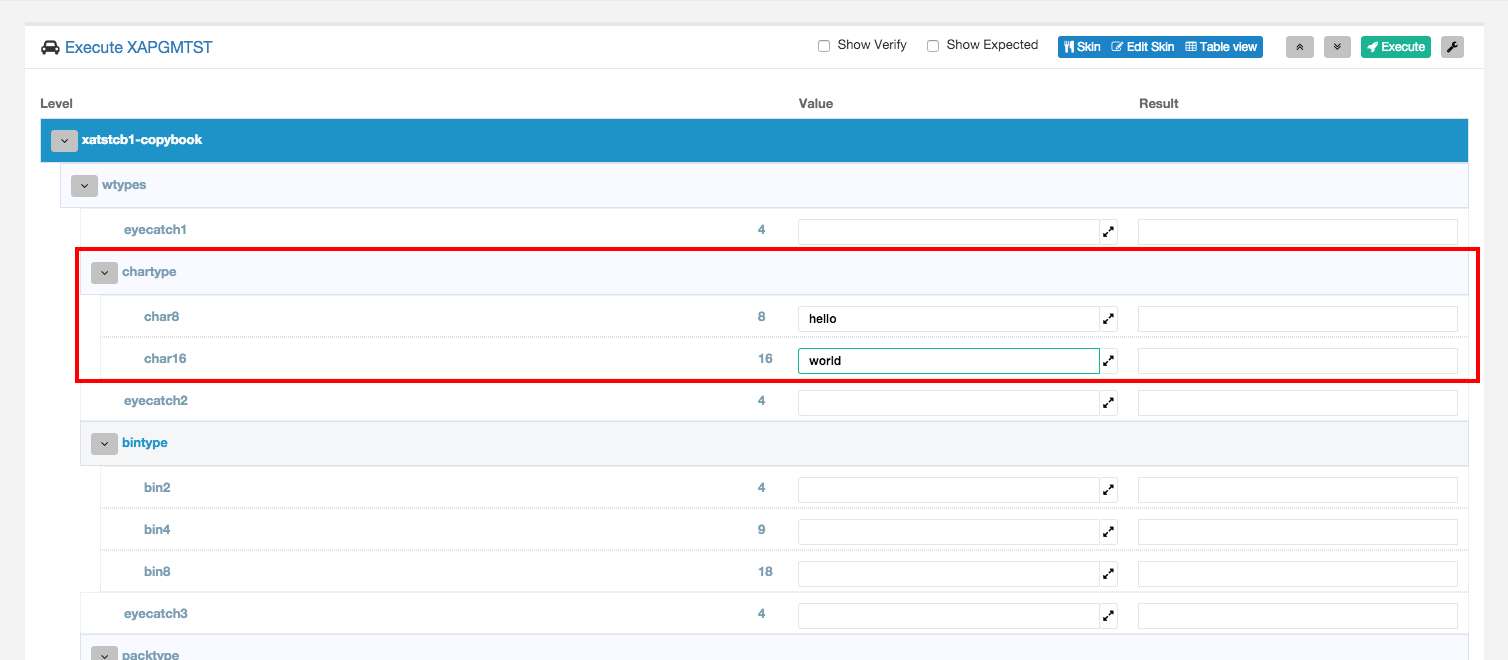
Click Execute to execute the program with the entered input data. A dialog appears asking for the password for your host user ID.
Once you enter you password credentials, the execution starts. The results appear after a few seconds, however if there is a connection problem with the host, you will get a timeout error after 20 seconds.
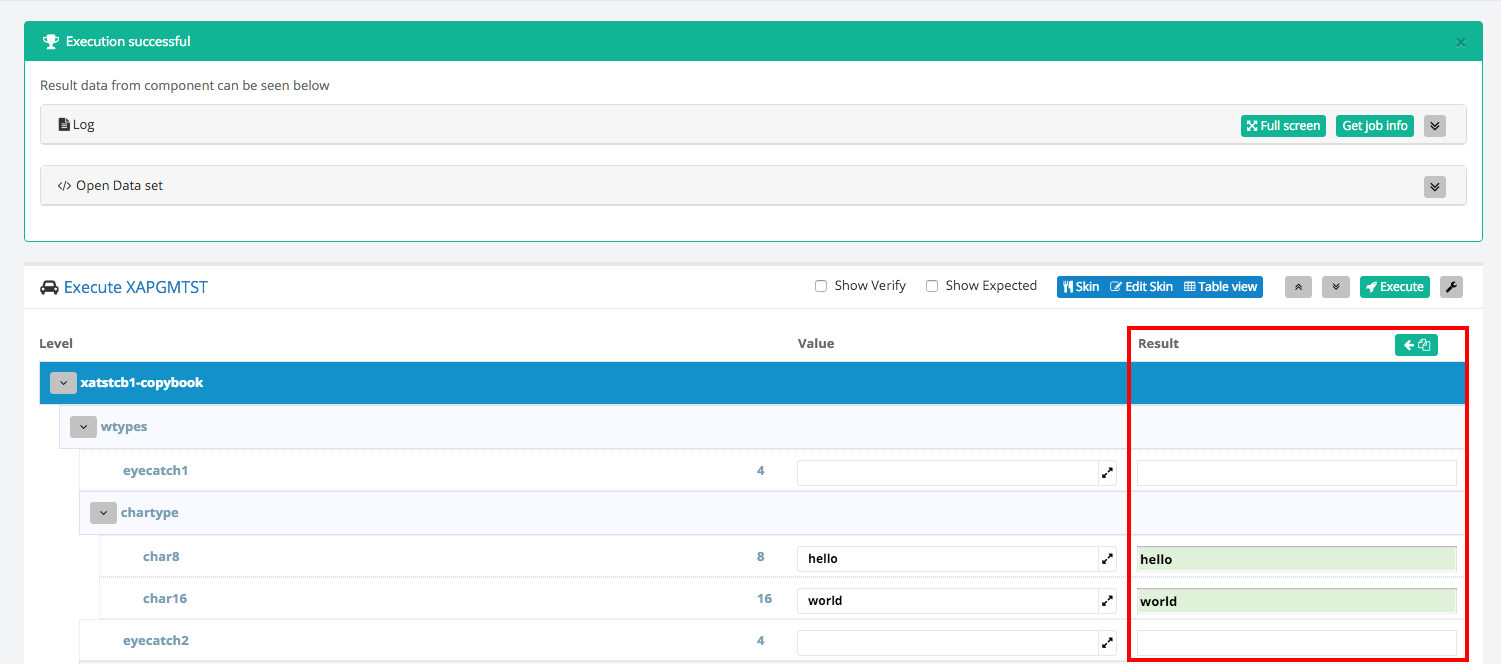
Examining Log and Job Data
After execution, a Success or Failure panel appears. Here you can examine the Topaz for Total Test Repository Server log, you can get information about the job that has been running at the host (including spool file information), and you can browse datasets and files from Unix System Services.
Changing Execution Settings
Clicking the ![]() icon shows options for the execution. In an Options panel, you can change the seconds until timeout, the log level, Accounting Info, execution options and other parameters. See Appendix A: Tutorial — Add a Component to the Repository with the Web Client.
icon shows options for the execution. In an Options panel, you can change the seconds until timeout, the log level, Accounting Info, execution options and other parameters. See Appendix A: Tutorial — Add a Component to the Repository with the Web Client.
Setting Up Verification Data
Verification data can be setup for each field in the data structure. Non-virtualized Test (Functional Test) evaluates that the actual result matches the expected result. It shows a Failed state if a field does not match its expected value. You can either define an expected value or you can define a verify expression that can, for example, match the value against a regular expression.
To setup expected values and one verify expression:
At the execution result page produced in the last section, select the Show expected check box. You will see a new column where expected values can be written. Click the Copy result button to copy all result values as expected values. You can also manually enter expected values.
In expected value for the char16 field, write
='w'+'ORLD'.toLowerCase()
This is a JavaScript expression that will evaluate to world when executed and also result in a successful result.
Execute again and see that the result has failed. A test will always fail if a field contains a timestamp that changes over time and is compared with a fixed value. Leave such fields empty. Instead you must use the Verify option.
Select the Show verify check box. An additional column appears. Here you can write expressions in JavaScript to check if the value is okay. For instance, you can check if the value matches a regular expression. Click the small arrow button to the right to open an editor for writing an expression. Try this on the xacurrenttime field and in the editor, choose the Example with Verify a regular expression as shown below.
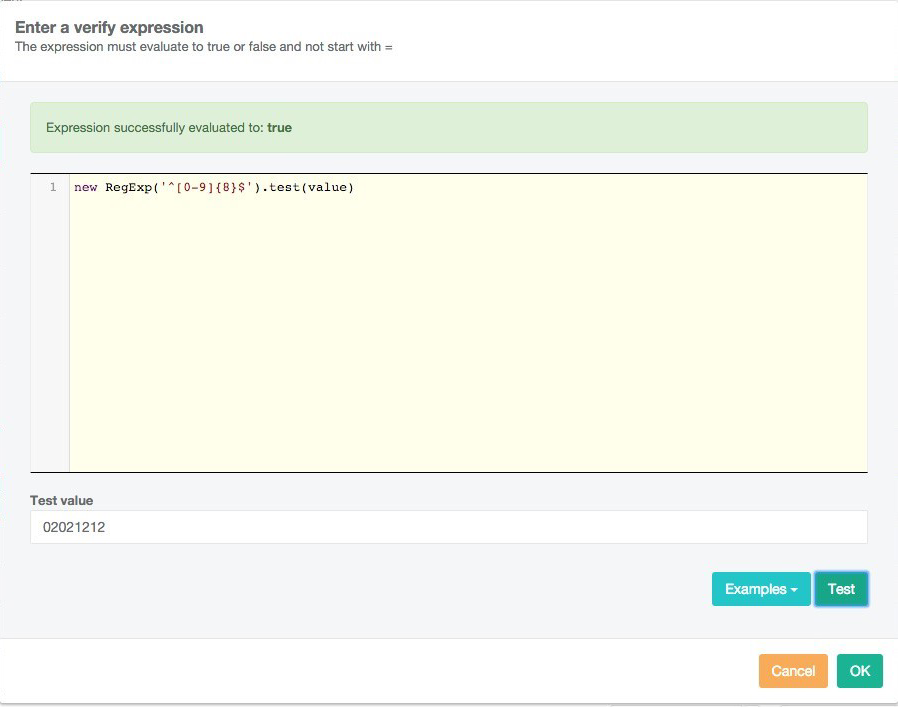
This example uses a regular expression that matches a string with 8 digits. You should see a regular expression:
new RegExp('^[0-9]{8}$').test(value)
The dialog lets you try out the expression on a test value and see how it evaluates. In the dialog, we have written a timestamp that is evaluated true by the regular expression. Click OK when ready.
You have setup the verification data. Execute again and evaluate that the execution was successful.
Creating a Test Scenario
Creating a simple test scenario in the browser is also straightforward. In previous section, verification data was set up for specific input data for a module execution. This is actually one unit test of the module where we specified input data and the expected outcome. Now we can save this data as a test scenario, which can be executed asynchronously at the server.
To setup a test scenario that verifies the result data.
Click the
 (wrench/options) button and save the data by clicking Save input.
 A dialog appears and asks how the data is to be saved.
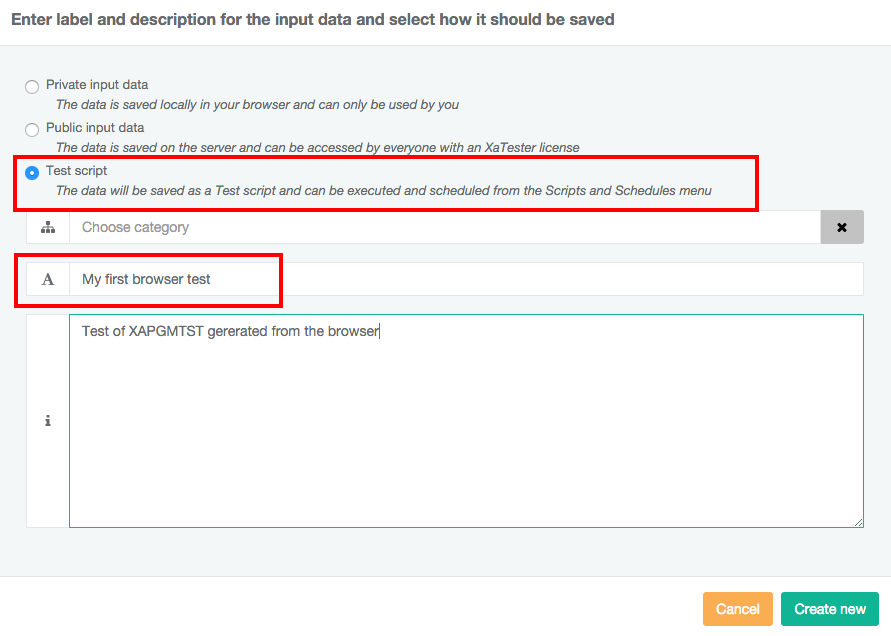
Choose Test scenario, enter a title and click OK. If Accounting Info was updated under the Execution Options tab, the Accounting Info will be saved together with the Test Scenario and used for future executions of the Test Scenario. In the Save dialog, the input data (and verification data) could also have been saved as private or public that could be later retrieved from the Component Repository > Skin/Data panel.
You have now created a test scenario of XAPGMTST.
Executing the Test Scenario
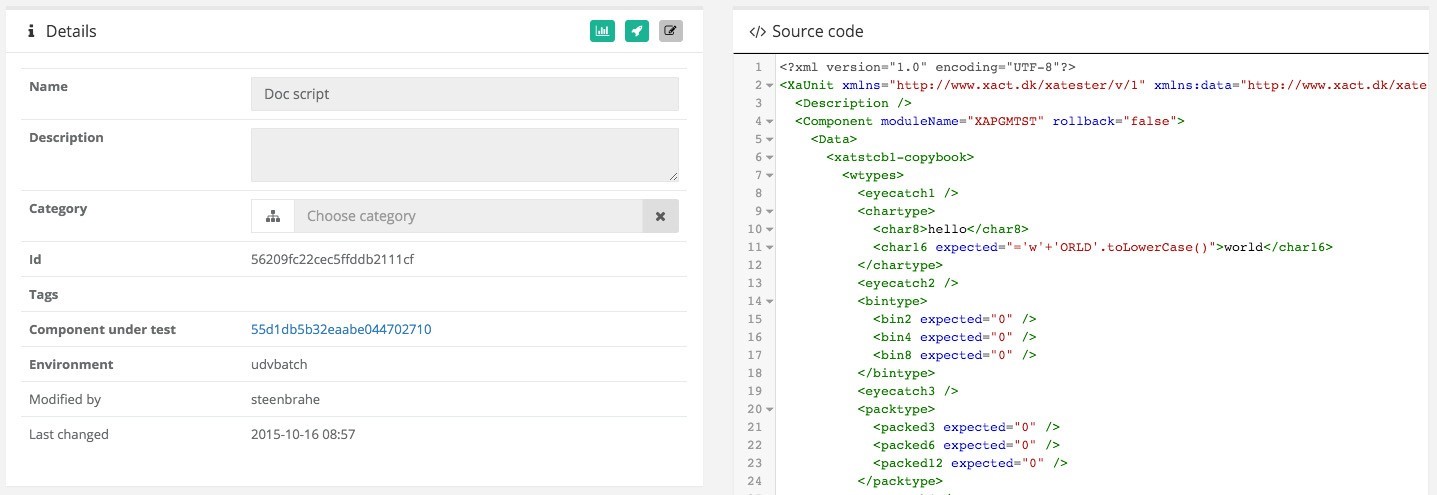
The test is found under the Test SCENARIOs menu on the navigation pane. Navigate to the test scenario and see its details.
Here you will find information about the test scenario and also the test scenario content as XML or as a graphical tree structure. The format of the XML is explained in detail in the Total Test Topaz Help.
To execute the test scenario and evaluate the result:
Execute the test scenario by clicking the Rocket icon.
You will be redirected to the Reports page where the state of the execution is shown. The execution will be in RUNNING state, meaning that the execution is still running as a background task at the server.
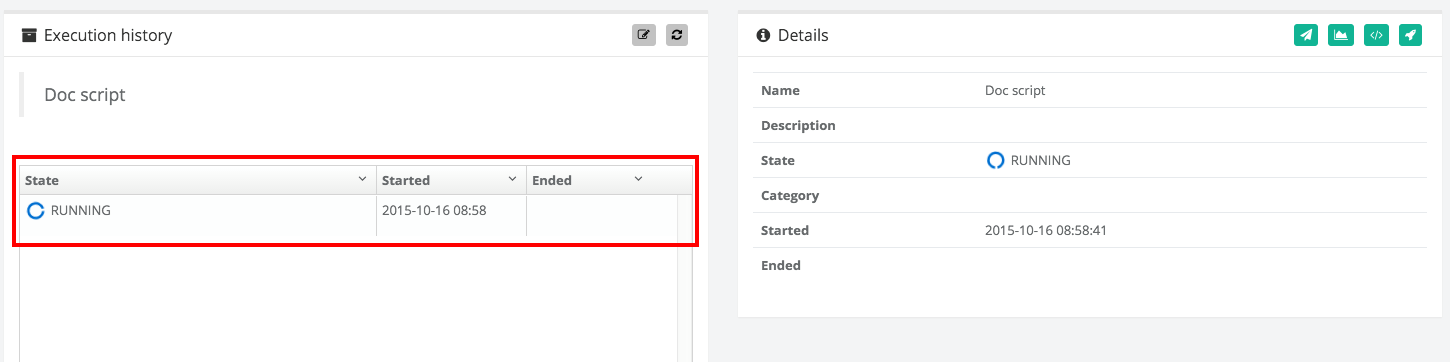
Click the Refresh button at the Execution History panel until the execution completes and shows a Completed, Failed or Error state.
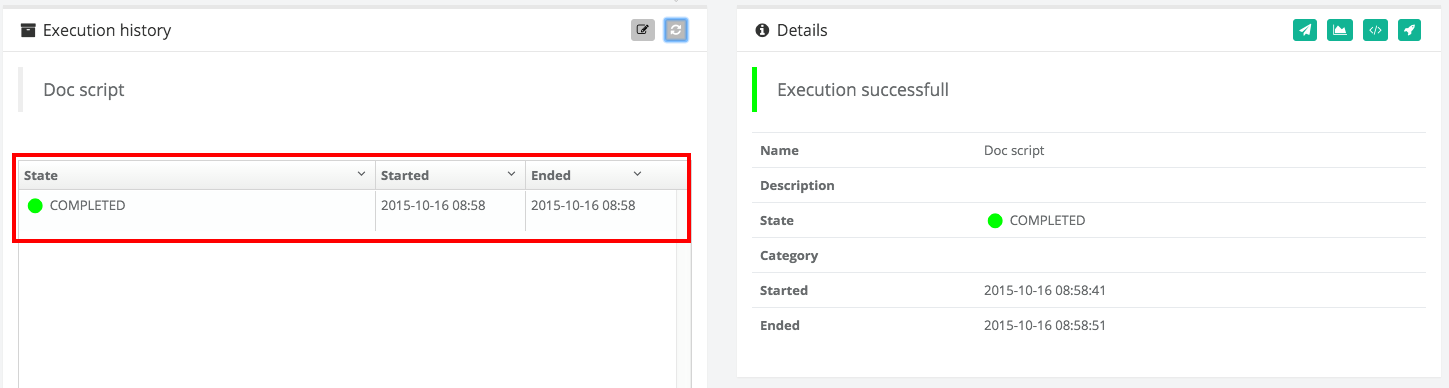
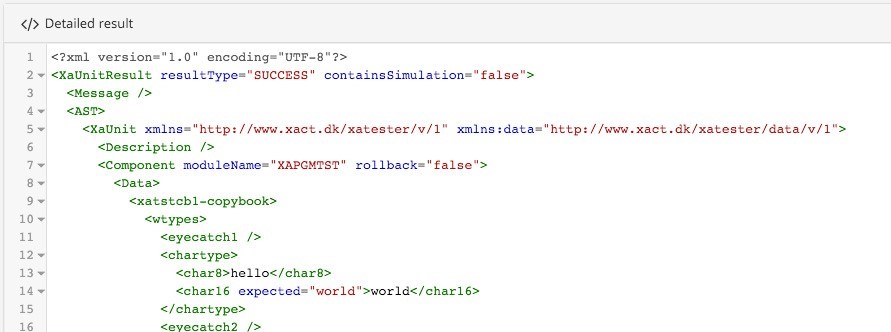
In this case, the execution successfully completed. View detailed data about the execution by clicking the Show detailed result button. This will show the result as XML.
This completes the introduction to the Non-virtualized Test (Functional Test) web client where we navigated the component repository, executed a component, and sat up verification data. The example is simple, and you might consider how you can test main batch programs, how you can control and change the JCL used for setting up the program and its input/output datasets, how to use Db2 based programs, how to verify data in datasets and Db2, how to make suites of tests, how you can check content of spool files and so on. All these questions will be answered during the rest of the documentation.
You are also able to set up test cases in the Total Test Eclipse client.